This is an updated version of my earlier Alexa shopping list method for Home Assistant. The basic idea is still the same: Node-RED fetches the Alexa shopping list, optionally sends it through OpenAI to sort it by supermarket aisles, saves the result into a local text file, and Home Assistant displays that file on a dashboard card. What changed in this version is the usability: the list is now visually separated into categories or aisles, items can be checked on and off directly from the dashboard, duplicate Alexa items are cleaned up before the list is sent to OpenAI, and the refresh button now shows a loading spinner while the list is being rebuilt.
Just as important, the Home Assistant side is now clearer. The button, clickable item text, loading state, and shopping list data sensor are exposed from Node-RED Companion. Home Assistant also needs the AnyList integration, the shell command writer, the sync automation, and the dashboard card. In my setup, the card and automation read sensor.node_red_buttons_shopping_list_data and its raw_list attribute, while todo.alexa_shopping_list_3 represents the AnyList/Alexa list.
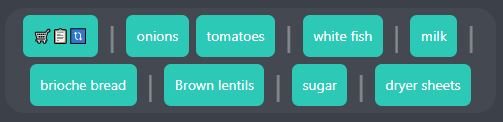
In the screenshot above, notice the vertical separators between groups of items. OpenAI still assigns each product to one of ten supermarket categories, but instead of coloring each item differently, the card now uses the categories to create subtle aisle breaks. In day-to-day use, I find this much easier on the eye for my kitchen Home Assistant dashboard.
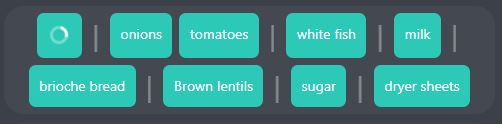
The refresh button now turns into a spinning animated loader while the flow is running. That matters because the OpenAI step is not instantaneous, and without visible feedback it is hard to know whether the button press actually did anything. In this version, Node-RED exposes a switch entity to Home Assistant and the card uses that switch to decide whether to show the normal refresh icon or an activity indicator.

Items can now also be checked on and off directly from the Home Assistant dashboard. Tapping an unchecked item marks it as completed. Tapping a completed item removes the checkmark. Internally, the current card writes a temporary text value back into a Node-RED text entity, Node-RED updates the Alexa list item itself, and it also updates the local file by adding or removing a leading ! in front of the product name. The card then uses that ! marker to draw the strikethrough.
What Changed From My Previous Version
- Category separators instead of category colors or simple sorting . OpenAI still sorts by aisles, but the card now displays clean separators between category groups instead of using a different background color per category.
- Direct check on/off from the dashboard. The list is now interactive. You can tap an item to mark it complete and tap it again to uncheck it.
- A visible loading state. While Node-RED is rebuilding the file, the refresh button turns into a spinner.
- No manually created Home Assistant helpers. In the previous approach, helper entities in Home Assistant were part of the flow. In this version, the extra entities are all exposed from Node-RED Companion instead.
- Duplicate handling for Alexa list items. Alexa shopping lists can contain the same item more than once. Before sending the list to OpenAI, this version deduplicates intelligently. If all copies are completed, it keeps one. If both completed and incomplete versions exist, it keeps only one incomplete version. If multiple incomplete copies exist, it keeps one and removes the rest.
How This Version Works
- Node-RED fetches the Alexa shopping list. I still use the Alexa Remote node for this because there is no direct Home Assistant equivalent for Alexa shopping lists.
- Node-RED deduplicates the list. This happens before categorization, so repeated Alexa items do not make the dashboard messy or get sent through the AI path unnecessarily.
- Node-RED checks the category memory first. The flow looks in
shoppingCategoryDbfor products it has already categorized. Known products reuse the stored aisle/category immediately. - Only unknown products are sent to the LLM. OpenAI is used for new items that are not yet in the category database. The returned categories are then saved back into
shoppingCategoryDb, so the same products can skip the LLM next time. - Node-RED writes the categorized text file and publishes the same data to Home Assistant. The file is saved as
/config/www/shopping_list.txt, and the Node-RED Companion sensorsensor.node_red_buttons_shopping_list_dataexposes the current text in itsraw_listattribute. - Home Assistant syncs the file-side view with AnyList. The automation watches the Node-RED sensor’s
raw_listattribute and the AnyList todo entity’sitems_signatureattribute. Whichever side changed becomes the source, and the automation only writes differences. - The dashboard card renders the Node-RED sensor data. It reads
raw_list, shows the loading state from Node-RED Companion, and sends item taps back into the Node-RED flow.
Final Setup Checklist
- Install moryoav/ha-anylist through HACS as a custom Integration repository, then add the AnyList integration in Home Assistant.
- Install Node-RED Companion and the required Node-RED nodes, including the Alexa Remote node and the Home Assistant websocket nodes.
- Install and configure an OpenAI node if you want automatic category discovery for products that are not yet in
shoppingCategoryDb. - Enable Node-RED file-backed context storage so
shoppingCategoryDbsurvives restarts. - Add the Home Assistant
shell_commandand placewrite_shopping_list_file.shunder/config/shell. - Restart Home Assistant and Node-RED after changing their configuration files.
- Confirm your entity IDs before saving the automation, especially
todo.alexa_shopping_list_3,sensor.node_red_buttons_shopping_list_data, andbutton.node_red_buttons_sync_shopping_list_text_with_alexa.
Install the New AnyList Integration
One important change in this version is the AnyList side of the setup. The original AnyList integration approach I tried was too fragile for my taste. It relied on an external AnyList Python package, and that package relied on a Rust extension. When that dependency chain did not line up cleanly with the Home Assistant environment, installs and updates became much more cumbersome than I wanted for something as basic as a shopping list.
For this version, I use moryoav/ha-anylist. It is a Home Assistant custom integration for AnyList that exposes shopping lists as Home Assistant todo entities. That todo entity is what the automation below uses when it reads and updates todo.alexa_shopping_list_3.
Install it through HACS as a custom repository:
- Open HACS in Home Assistant.
- Open the HACS menu and choose Custom repositories.
- Add
https://github.com/moryoav/ha-anylistas an Integration repository. - Search for AnyList in HACS and install it.
- Restart Home Assistant.
- Go to Settings → Devices & Services → Add Integration, search for AnyList, and sign in with your AnyList account.
After setup, check the entity name Home Assistant created for your shopping list. Mine is todo.alexa_shopping_list_3, but yours may be different. If it is, update the automation before saving it. The automation also calls anylist.refresh, so this integration needs to be installed before the automation will run correctly.
A Quick Note About Home Assistant Entities in This Version
The main Home Assistant entity used by both the card and the automation is the Node-RED Companion sensor sensor.node_red_buttons_shopping_list_data. The flow publishes the current categorized shopping list into that sensor’s raw_list attribute. The card reads that attribute directly, and the automation watches it for file-side changes.
If Home Assistant OS blocks access to the file path, add the following to configuration.yaml and restart Home Assistant:
homeassistant:
  allowlist_external_dirs:
    - /config/www
The physical file is still /config/www/shopping_list.txt, so keep /config/www allowed if your Home Assistant install requires it for local file access. The current card and automation snippets do not read from a separate file-sensor entity; they expect the Node-RED Companion sensor and its raw_list attribute.
Add the Shell Command Writer
The automation below needs one more Home Assistant-side helper: a shell command that safely rewrites /config/www/shopping_list.txt. Add this to your configuration.yaml:
shell_command:
  write_shopping_list_file_b64: 'bash /config/shell/write_shopping_list_file.sh "{{ content_b64 }}"'
Then create the folder /config/shell if it does not already exist, and place this script inside it as write_shopping_list_file.sh:
#!/bin/sh
set -eu

TMP_FILE="/config/www/shopping_list.txt.tmp"
TARGET_FILE="/config/www/shopping_list.txt"

printf '%s' "$1" | base64 -d > "$TMP_FILE"
mv "$TMP_FILE" "$TARGET_FILE"
The automation sends the desired file content as base64, and the script decodes it into a temporary file before moving it into place. That keeps the write simple and avoids quoting problems with commas, spaces, or special characters in shopping list items. After adding the shell command to configuration.yaml, restart Home Assistant so the new service is available.
The Missing Home Assistant Automation
The Node-RED flow handles the Alexa and file side of the setup, but this Home Assistant automation is the piece that keeps the file and the AnyList todo entity in sync. It watches both sides, normalizes the items, compares the lists, and only writes changes when something actually differs.
Replace the entity IDs with the ones from your own setup before saving it. In my setup, the important entities are sensor.node_red_buttons_shopping_list_data, todo.alexa_shopping_list_3, button.node_red_buttons_sync_shopping_list_text_with_alexa, and shell_command.write_shopping_list_file_b64.
alias: Shopping List Sync | Alexa File <-> AnyList
description: >
  Two-way sync between shopping_list.txt (via
  sensor.node_red_buttons_shopping_list_data.raw_list) and
  todo.alexa_shopping_list_3. Source of truth is whichever side triggered. File
  format is category-prefixed, e.g. 2-milk or 2-!milk. New AnyList-only items
  get temporary category 10 until Node-RED/Alexa re-categorizes them.
triggers:
  - alias: File sensor changed - Node-RED shopping_list.txt is the source
    entity_id:
      - sensor.node_red_buttons_shopping_list_data
    attribute: raw_list
    id: file_source
    trigger: state
    for:
      seconds: 5
  - alias: AnyList todo changed - Alexa/AnyList is the source
    entity_id:
      - todo.alexa_shopping_list_3
    id: anylist_source
    trigger: state
    attribute: items_signature
conditions: []
actions:
  - alias: Stop early if the triggering source is unavailable
    choose:
      - alias: Stop when the Node-RED file sensor has no usable raw_list
        conditions:
          - alias: >-
              File-side trigger, but the sensor or raw_list attribute is
              unavailable
            condition: template
            value_template: |
              {{ trigger.id == 'file_source'
                 and (
                   states('sensor.node_red_buttons_shopping_list_data') in ['unknown', 'unavailable']
                   or state_attr('sensor.node_red_buttons_shopping_list_data', 'raw_list') is none
                 ) }}
        sequence:
          - alias: Stop because the file-side source cannot be read
            stop: Shopping list Node-RED sensor/attribute is unavailable
      - alias: Stop when the AnyList todo entity is unavailable
        conditions:
          - alias: AnyList-side trigger, but the todo entity is unavailable
            condition: template
            value_template: |
              {{ trigger.id == 'anylist_source'
                 and states('todo.alexa_shopping_list_3') in ['unknown', 'unavailable'] }}
        sequence:
          - alias: Stop because the AnyList source cannot be read
            stop: AnyList entity is unavailable
  - alias: Refresh AnyList first when the file side triggered the sync
    choose:
      - alias: File is source, so refresh AnyList before comparing lists
        conditions:
          - alias: Continue only when the trigger came from the file sensor
            condition: template
            value_template: "{{ trigger.id == 'file_source' }}"
        sequence:
          - alias: Refresh AnyList data from the integration
            action: anylist.refresh
            data: {}
          - alias: Give AnyList refresh a few seconds to settle
            delay: "00:00:03"
  - alias: Read all active and completed AnyList items
    action: todo.get_items
    target:
      entity_id: todo.alexa_shopping_list_3
    data:
      status:
        - needs_action
        - completed
    response_variable: anylist_response
  - alias: Normalize file and AnyList items into comparable JSON lists
    variables:
      file_raw: |-
        {{ state_attr('sensor.node_red_buttons_shopping_list_data', 'raw_list')
           | default('', true) }}
      file_items_json: >-
        {% set raw = file_raw %} {% set ns = namespace(items=[]) %} {% if raw
        not in ['unknown', 'unavailable', 'none', ''] %}
          {% for part in raw.split(',') %}
            {% set entry = part | trim %}
            {% if entry %}
              {% set bits = entry.split('-', 1) %}
              {% if bits | count > 1 %}
                {% set category = bits[0] | trim %}
                {% set raw_name = bits[1] | trim %}
              {% else %}
                {% set category = '10' %}
                {% set raw_name = bits[0] | trim %}
              {% endif %}
              {% set completed = raw_name.startswith('!') %}
              {% set summary = raw_name[1:] if completed else raw_name %}
              {% set ns.items = ns.items + [{
                'summary': summary,
                'completed': completed,
                'category': category,
                'key': (summary | lower | trim)
              }] %}
            {% endif %}
          {% endfor %}
        {% endif %} {{ ns.items | to_json }}
      anylist_items_json: >-
        {% set todo_items = anylist_response.get('todo.alexa_shopping_list_3',
        {}).get('items', []) %} {% set ns = namespace(items=[]) %} {% for item
        in todo_items %}
          {% set summary = item.summary | trim %}
          {% if summary %}
            {% set ns.items = ns.items + [{
              'summary': summary,
              'completed': item.status == 'completed',
              'uid': item.uid,
              'status': item.status,
              'key': (summary | lower | trim)
            }] %}
          {% endif %}
        {% endfor %} {{ ns.items | to_json }}
      source_signature: >-
        {% set src = (file_items_json | from_json(default=[])) if trigger.id ==
        'file_source' else (anylist_items_json | from_json(default=[])) %} {%
        set ns = namespace(vals=[]) %} {% for item in src |
        sort(attribute='key') %}
          {% set ns.vals = ns.vals + [item.key ~ '|' ~ ('1' if item.completed else '0')] %}
        {% endfor %} {{ ns.vals | join(',') }}
      dest_signature: >-
        {% set dst = (anylist_items_json | from_json(default=[])) if trigger.id
        == 'file_source' else (file_items_json | from_json(default=[])) %} {%
        set ns = namespace(vals=[]) %} {% for item in dst |
        sort(attribute='key') %}
          {% set ns.vals = ns.vals + [item.key ~ '|' ~ ('1' if item.completed else '0')] %}
        {% endfor %} {{ ns.vals | join(',') }}
  - alias: Stop when both sides already contain the same items and completion states
    if:
      - alias: Compare source and destination signatures
        condition: template
        value_template: "{{ source_signature == dest_signature }}"
    then:
      - alias: Stop because no sync changes are needed
        stop: Lists already synchronized
  - alias: Apply changes in the correct direction based on the trigger source
    choose:
      - alias: File changed, so update AnyList to match shopping_list.txt
        conditions:
          - alias: Run file-to-AnyList sync only for file-side triggers
            condition: template
            value_template: "{{ trigger.id == 'file_source' }}"
        sequence:
          - alias: Calculate AnyList additions, removals, and completion updates
            variables:
              anylist_add_json: >-
                {% set src = file_items_json | from_json(default=[]) %} {% set
                dst_keys = (anylist_items_json | from_json(default=[])) |
                map(attribute='key') | list %} {% set ns = namespace(items=[])
                %} {% for item in src %}
                  {% if item.key not in dst_keys %}
                    {% set ns.items = ns.items + [item] %}
                  {% endif %}
                {% endfor %} {{ ns.items | to_json }}
              anylist_remove_json: >-
                {% set src_keys = (file_items_json | from_json(default=[])) |
                map(attribute='key') | list %} {% set dst = anylist_items_json |
                from_json(default=[]) %} {% set ns = namespace(items=[]) %} {%
                for item in dst %}
                  {% if item.key not in src_keys %}
                    {% set ns.items = ns.items + [item] %}
                  {% endif %}
                {% endfor %} {{ ns.items | to_json }}
              anylist_update_json: >-
                {% set src = file_items_json | from_json(default=[]) %} {% set
                dst = anylist_items_json | from_json(default=[]) %} {% set ns =
                namespace(items=[]) %} {% for s in src %}
                  {% set match = (dst | selectattr('key', 'eq', s.key) | list | first | default(none)) %}
                  {% if match is not none and match.completed != s.completed %}
                    {% set ns.items = ns.items + [{
                      'uid': match.uid,
                      'summary': s.summary,
                      'completed': s.completed
                    }] %}
                  {% endif %}
                {% endfor %} {{ ns.items | to_json }}
          - alias: Add items that exist in the file but not in AnyList
            repeat:
              for_each: "{{ anylist_add_json | from_json(default=[]) }}"
              sequence:
                - alias: Add missing item to AnyList
                  action: todo.add_item
                  target:
                    entity_id: todo.alexa_shopping_list_3
                  data:
                    item: "{{ repeat.item.summary }}"
                - alias: >-
                    Mark newly added AnyList item completed when the file item
                    starts with !
                  if:
                    - alias: Check whether the file item is completed
                      condition: template
                      value_template: "{{ repeat.item.completed }}"
                  then:
                    - alias: Set the newly added AnyList item to completed
                      action: todo.update_item
                      target:
                        entity_id: todo.alexa_shopping_list_3
                      data:
                        item: "{{ repeat.item.summary }}"
                        status: completed
          - alias: Remove AnyList items that no longer exist in the file
            repeat:
              for_each: "{{ anylist_remove_json | from_json(default=[]) }}"
              sequence:
                - alias: Remove extra item from AnyList by UID
                  action: todo.remove_item
                  target:
                    entity_id: todo.alexa_shopping_list_3
                  data:
                    item: "{{ repeat.item.uid }}"
          - alias: Update AnyList completion states to match the file
            repeat:
              for_each: "{{ anylist_update_json | from_json(default=[]) }}"
              sequence:
                - alias: Set AnyList item status to completed or needs_action
                  action: todo.update_item
                  target:
                    entity_id: todo.alexa_shopping_list_3
                  data:
                    item: "{{ repeat.item.uid }}"
                    status: >-
                      {{ 'completed' if repeat.item.completed else
                      'needs_action' }}
      - alias: >-
          AnyList changed, so rewrite shopping_list.txt and ask Node-RED to sync
          Alexa
        conditions:
          - alias: Run AnyList-to-file sync only for AnyList-side triggers
            condition: template
            value_template: "{{ trigger.id == 'anylist_source' }}"
        sequence:
          - alias: >-
              Build the desired file text from AnyList while preserving known
              categories
            variables:
              desired_file_text: >-
                {% set src = anylist_items_json | from_json(default=[]) %} {%
                set current_file = file_items_json | from_json(default=[]) %} {%
                set ns = namespace(entries=[]) %} {% for item in src %}
                  {% set existing = (current_file | selectattr('key', 'eq', item.key) | list | first | default(none)) %}
                  {% set category = existing.category if existing is not none else '10' %}
                  {% set entry = category ~ '-' ~ ('!' if item.completed else '') ~ item.summary %}
                  {% set ns.entries = ns.entries + [entry] %}
                {% endfor %} {{ ns.entries | join(',') }}
          - alias: Rewrite the file only if the generated file text changed
            if:
              - alias: Compare desired file text with the current raw file text
                condition: template
                value_template: "{{ desired_file_text != file_raw }}"
            then:
              - alias: Write updated shopping_list.txt through shell command
                action: shell_command.write_shopping_list_file_b64
                data:
                  content_b64: "{{ desired_file_text | base64_encode }}"
              - alias: Let the file write settle before triggering Node-RED
                delay: "00:00:01"
              - alias: Tell Node-RED to sync the rewritten file text with Alexa
                action: button.press
                target:
                  entity_id: button.node_red_buttons_sync_shopping_list_text_with_alexa
mode: queued
max: 10
Node-RED Setup Notes
- Install node-red-contrib-alexa-remote2-applestrudel.
- Install and configure an OpenAI node if you want automatic category discovery for unknown products. I used @inductiv/node-red-openai-api. Once an item is stored in
shoppingCategoryDb, the flow can reuse that category and skip the LLM for that product. - Install Node-RED Companion from HACS and set up the Node-RED Home Assistant server connection.
- Import the flow below and then edit the account, server, service host, entity config, and file path details so they match your own environment.
- Do not assume my Alexa account IDs, list IDs, OpenAI service config, Home Assistant server config, or local IP addresses will match yours. They will not. You must open the relevant nodes and adapt them to your own system.
Node-RED Category Memory
There is another important feature in the Node-RED flow: it remembers which products belong to which aisles. The first time a product appears, the flow can ask the AI LLM to categorize it. After that, the result is saved, so the next time the same product appears, Node-RED can reuse the known aisle instead of sending it back to the LLM.
This means the system slowly builds its own product-to-category database. Over time, common household items should already be known, and the LLM only needs to help with new or unusual products. Eventually, for a stable shopping list, the AI step becomes less and less important.
The flow stores this mapping in a flow variable called shoppingCategoryDb. That variable must be stored on disk, not only in memory, otherwise the learned categories would disappear after a Node-RED restart.
To enable file-backed context storage, edit your Node-RED settings.js / config.js and add a contextStorage section like this:
contextStorage: {
    default: "memoryOnly",
    memoryOnly: { module: "memory" },
    file: { module: "localfilesystem" }
},
This keeps the default context in memory, but also adds a file storage option using Node-RED’s local filesystem storage. The flow uses that file store for shoppingCategoryDb, so the category database survives restarts and keeps growing as the system learns more products.
After changing the Node-RED configuration, restart Node-RED before importing or running the flow. If the file context store is missing, the flow will not be able to persist the learned aisle/category database properly.
The Updated TailwindCSS Template Card
This is the current card I am using. It reads the file sensor, shows a spinner while the list is refreshing, inserts separators between aisle groups, and lets you tap items to check or uncheck them. Paste it into a TailwindCSS Template Card in Home Assistant.
entity: ""
content: "<div class=\"flex flex-wrap gap-2 justify-center p-2\">\r\n  {% set raw_list = state_attr('sensor.node_red_buttons_shopping_list_data', 'raw_list') %}\r\n  {% set raw_list = raw_list if raw_list is string else '' %}\r\n  {% set raw_list = raw_list | trim %}\r\n  {% set invalid_states = ['unknown', 'unavailable', 'none', ''] %}\r\n  {% set is_updating = is_state('switch.node_red_buttons_updating_shopping_list', 'on') %}\r\n\r\n  <div class=\"bg-accent rounded-lg p-3\">\r\n    {% if is_updating %}\r\n      <div\r\n        class=\"flex items-center justify-center\"\r\n        style=\"width: 24px; height: 24px;\"\r\n      >\r\n        <div\r\n          style=\"\r\n            width: 18px;\r\n            height: 18px;\r\n            border: 3px solid rgba(255,255,255,0.35);\r\n            border-top-color: rgba(255,255,255,1);\r\n            border-radius: 50%;\r\n            animation: spin 0.8s linear infinite;\r\n          \"\r\n        ></div>\r\n      </div>\r\n    {% else %}\r\n      <div\r\n        onclick=\"hass.callService('button', 'press', {entity_id: 'button.update_shopping_list_nodered'});\"\r\n        class=\"hover:scale-105 transition-all cursor-pointer\"\r\n        style=\"font-size:14px;\"\r\n      >\r\n        🛒📋🔃\r\n      </div>\r\n    {% endif %}\r\n  </div>\r\n\r\n  {% if raw_list not in invalid_states %}\r\n    <div class=\"self-center px-1\" style=\"font-size:28px; line-height:1; opacity:0.35;\">|</div>\r\n  {% endif %}\r\n\r\n  {% if raw_list in invalid_states %}\r\n    <div class=\"bg-accent rounded-lg p-3\">\r\n      <span style=\"font-size:14px;\">Shopping list is empty</span>\r\n    </div>\r\n  {% else %}\r\n    {% set items = raw_list.split(',') %}\r\n    {% set first_group = namespace(done=false) %}\r\n\r\n    {% for cat in range(1, 11) %}\r\n      {% set has_items = namespace(value=false) %}\r\n\r\n      {% for i in range(0, items | count) %}\r\n        {% set item = items[i].strip() %}\r\n        {% if item.startswith(cat|string + '-') %}\r\n          {% set has_items.value = true %}\r\n        {% endif %}\r\n      {% endfor %}\r\n\r\n      {% if has_items.value %}\r\n        {% if first_group.done %}\r\n          <div class=\"self-center px-1\" style=\"font-size:28px; line-height:1; opacity:0.35;\">|</div>\r\n        {% else %}\r\n          {% set first_group.done = true %}\r\n        {% endif %}\r\n\r\n        {% for i in range(0, items | count) %}\r\n          {% set item = items[i].strip() %}\r\n\r\n          {% if item.startswith(cat|string + '-') %}\r\n            {% set item_name_raw = item.split('-', 1)[1] %}\r\n\r\n            {% if item_name_raw.startswith('!') %}\r\n              {% set item_name_display = item_name_raw[1:] %}\r\n              {% set is_source_checked = true %}\r\n              {% set click_value = '!' + item_name_display %}\r\n            {% else %}\r\n              {% set item_name_display = item_name_raw %}\r\n              {% set is_source_checked = false %}\r\n              {% set click_value = item_name_display %}\r\n            {% endif %}\r\n\r\n            {% if is_source_checked %}\r\n              {% set text_decoration = 'line-through' %}\r\n              {% set opacity = '0.65' %}\r\n            {% else %}\r\n              {% set text_decoration = 'none' %}\r\n              {% set opacity = '1' %}\r\n            {% endif %}\r\n\r\n            <div\r\n              class=\"bg-accent rounded-lg p-3 cursor-pointer hover:scale-105 transition-all\"\r\n              style=\"opacity: {{ opacity }};\"\r\n              onclick=\"hass.callService('text', 'set_value', {entity_id: 'text.node_red_buttons_shopping_list_item_removed', value: '{{ click_value }}'});\"\r\n            >\r\n              <span\r\n                id=\"item-{{ i }}\"\r\n                style=\"font-size:14px; text-decoration: {{ text_decoration }};\"\r\n              >\r\n                {{ item_name_display }}\r\n              </span>\r\n            </div>\r\n          {% endif %}\r\n        {% endfor %}\r\n      {% endif %}\r\n    {% endfor %}\r\n  {% endif %}\r\n\r\n  <style>\r\n    @keyframes spin {\r\n      to { transform: rotate(360deg); }\r\n    }\r\n  </style>\r\n</div>"
ignore_line_breaks: true
always_update: false
parse_jinja: true
code_editor: Ace
entities: []
bindings: []
actions: []
debounceChangePeriod: 100
plugins:
  daisyui:
    enabled: true
    url: https://cdn.jsdelivr.net/npm/daisyui@latest/dist/full.css
    theme: dark - dark
    overrideCardBackground: false
  tailwindElements:
    enabled: false
type: custom:tailwindcss-template-card
The Updated Node-RED Flow
Below is the current full flow. Import it into Node-RED, then go through the nodes and update the parts that are environment-specific. That includes your Alexa account node, your Alexa shopping list ID, your Home Assistant server config, your Node-RED Companion entity configs, your OpenAI API node, and your file paths if they differ from mine.
Why The Duplicate Cleanup Matters
Alexa shopping lists can contain duplicates surprisingly easily. You can add the same item multiple times by voice, or end up with both a completed and an incomplete version of the same item. If I sent that directly to OpenAI, the dashboard could become messy, and the list would not reflect how I actually want to shop.
So in this version I clean duplicates before the AI step. The logic is:
- If all copies of an item are completed, keep only one completed copy.
- If at least one copy is incomplete, keep one incomplete copy and remove all completed copies.
- If multiple incomplete copies exist, keep one and remove the rest.
The removed duplicates are emitted from a second function output one at a time so they can be removed from Alexa asynchronously. This keeps the list cleaner and avoids showing repeated items on the dashboard.
One Remaining Caveat
The AnyList side is much better in this version because ha-anylist exposes an items_signature attribute. The automation watches that attribute, so edits coming from the AnyList/Alexa side have a real Home Assistant trigger instead of depending only on a Node-RED voice event or a manual dashboard refresh.
The remaining caveat is timing. If a change is made in AnyList or through Alexa, Home Assistant can only react after the AnyList integration sees the updated list and refreshes the todo entity. In normal use that is fine, but if something looks delayed, I would first check the AnyList integration refresh behavior and the entity’s items_signature attribute.
Bottom Line
This version feels much closer to what I originally wanted. The list is still built on top of a workaround, because Amazon does not provide a friendly official path for this use case, but the experience is much nicer now. The dashboard is compact, the aisle grouping is easy to scan, duplicates are handled, the refresh flow gives visual feedback, and the items can be checked on or off directly from the wall tablet while shopping.
It is still not perfect. The setup depends on the Alexa community node, the AnyList custom integration, and the local Node-RED/Home Assistant glue staying healthy. But the important part is that changes from the file side and the AnyList side now have a clear sync path, and repeated products get easier to handle as the category database grows.
If you adapt this for your own setup and find a nicer way to display the aisles on the card, or a cleaner way to manage the category memory, I would love to hear about it.