
Why Build a Travel Router?
I travel quite a bit, and one of the recurring annoyances when arriving at hotels, Airbnbs, or cafes is dealing with unfamiliar, untrusted Wi-Fi. Even when the connection is stable, there are two consistent issues:
- Security risks – You don’t know who else is on the network.
- No access to your “home” network – It’s not easy to securely access files, media servers, or your Home Assistant setup back home, from all your devices. Running a VPN client on each and every device is possible, but cumbersome.
That’s where the idea of a travel router comes in.


With a compact Raspberry Pi-based device, you can take your own DIY router wherever you go. It first connects to the local internet – via WiFi or, when available, Ethernet, and then creates a secure access point that:
- Securely connect your devices to the internet, phones, laptop, Google Chromecast device, smart TVs.
- Blocks ads for all your connected devices.
- Tunnels traffic home, so your devices behave as if they are physically at your house.
- Lets you securely access your files, media, and smart home setup, without exposing your home to the internet.
It’s fast, safe, and gives you full control – perfect for traveling abroad or working remotely from unfamiliar networks.
Existing Solutions
Before we go any further, it’s important to understand the two main software options for building a travel router on a Raspberry Pi: PiFi (pifi.org) and RaspAP (raspap.com). I’ve tested both, and while PiFi works well out of the box, I found it limiting when it came to tweaking the underlying system. Small changes often led to breakages, and in some cases, I couldn’t even reboot the system properly. PiFi also has stricter compatibility requirements when it comes to WiFi dongles, we’ll get to that in a moment.
On the other hand, RaspAP is far more flexible: it lets me configure everything exactly as I want, install additional software, and better control how the router behaves. I’ll cover some of these customizations in future posts, but for now, just know that this guide is based on RaspAP.
Regardless of the platform you choose, the basic concept is the same:
You install the software on a Raspberry Pi, connect a USB WiFi dongle, and configure the system so that one WiFi interface connects to the internet, while the other creates a local WiFi network for your devices to use. This allows any device you connect (laptop, phone, tablet, Chromecast) to get internet access through the Raspberry Pi.
However, relying on the Pi’s built-in WiFi creates a major performance bottleneck. It’s not very fast, can’t be connected to an external antenna to improve signal strength, and just doesn’t cut it for stable and high-speed access. That’s why the ideal setup uses two USB WiFi dongles – one for the upstream internet connection and the other as your private access point. Choosing a dongle isn’t trivial because many models sold online aren’t Raspberry Pi-compatible. The community-maintained compatibility list of USB Wi-Fi chipsets was invaluable when picking the best dongle.
Another big advantage of using a Raspberry Pi is that you can easily use an older, cheaper model like the Raspberry Pi 4B, and still get great performance. You can also connect a low-cost SSD to boot the operating system and cache data more efficiently, something I’ll demonstrate how to use in a later post.
To build this portable router, you’ll need at a minimum:
- A Raspberry Pi
- An SSD
- An enclosure that supports the SSD and keeps the setup compact
- Two USB WiFi dongles
Now, here’s something very important: power limitations.
On the Raspberry Pi 4 Model B, the two USB 3.0 and two USB 2.0 ports share a total downstream current limit of 1.1 A, according to the official datasheet. That’s not enough to reliably power two WiFi dongles and an SSD at the same time.
The Raspberry Pi 5 starts off even more limited, offering just 0.6A total unless you use a proper USB-PD 5 V 5A power supply. With a compatible power source, that limit increases to 1.6A. It also includes a PCIe Gen2 x1 connector, which allows you to connect an NVMe SSD directly, freeing up the USB ports entirely and often removing the need for a powered hub.
But if you’re using a Raspberry Pi 4, which doesn’t have PCIe, an unpowered USB hub won’t help. You must use a powered USB hub to ensure that the SSD and both WiFi dongles run reliably.
What You’ll Need: Shopping List
I aimed to select components that are powerful but affordable. These are the exact items I personally tested and recommend. Of course, you’re free to use alternatives, but your mileage may vary.
Hardware
- Raspberry Pi 4B – 8GB RAM
Buy on AliExpress - Argon One SSD Case
Buy on AliExpress - Orico USB Hub (powered)
Buy on AliExpress - 2x EDUP WiFi 6E USB Dongles
Buy on AliExpress - Travel Adapter / Power Source
Buy on Aliexpress - Dual-head USB Cable (for both the Pi and the Hub)
Buy on Aliexpress
Together they give you one WiFi adapter for the upstream internet and another for your own network, while the travel power adapter supplies enough outlets to run a Chromecast, charge phones, and even power a laptop.
Setting Up the Pi as a Travel Router
Once your hardware arrives and you’ve assembled everything, the setup process consists of three main steps: installing RaspAP, enabling multiple access points, and fixing its limitations using my custom scripts.
Step 1 – Install RaspAP
RaspAP can be installed in several ways. After trying them all, I settled on what I think is the simplest and most reliable method, one that still leaves you plenty of flexibility:
- Download Raspberry Pi Imager (https://www.raspberrypi.com/software/). Insert a MicroSD card to your computer and using the Raspberry Pi Imager select the option to install the latest Raspbian 64bit (marked as “recommended” in that software).
- Temporarily connect a screen, keyboard and mouse to the pi and boot it up with your MicroSD card in. The system will by default boot from that card, giving you full linux GUI system.
- Then, open a browser and download the latest RaspAp ARM64 zip from here: https://github.com/RaspAP/raspap-webgui/releases/latest
(Make sure you download the ARM64 version). - Use the Raspberry Pi Imager (it should be bundled with the Linux you’re now running), and use it to now burn the RaspAp image on the SSD card.
- Go into terminal window, type sudo raspi-config, Advanced Options, Boot Order, and choose the option to boot from a USB drive (which is your SSD where we just installed RaspAp).
- Save and Restart.
- You can now disconnect the screen, keyboard and mouse, no need for them anymore, at least for now.
Those steps essentially created a dual-boot system. On the SSD we have the RaspAp system which will boot by default to give us the router functionality. Plus, with one click, you can easily decide to boot from the MicroSD card for doing other things that require GUI (we’ll discuss that as well in a later post).
Now that you’ve booted into RaspAp, you’ll see a new WiFi network you can connect to from your phone or computer. By default this new network will be called RaspAp, you can connect to it, the default network password will be ChangeMe.
Then, open a browser on your computer and go into the IP address 10.3.141.1 (bonus points for whoever gets why those numbers were chosen). You’ll reach the RaspAp GUI, the default username will be admin and the default password will be secret.
If this is your first time with RaspAp, then I recommend you go into the submenus and get yourself familiarized with the menus and options. Apart from a handful of early tweaks, you’ll rarely need the web interface again once the initial setup is complete.
If you want to learn more and understand RaspAp better, then the official RaspAp documentation is here: https://docs.raspap.com
Step 2 – Enable Multi-AP Support
Out of the box, RaspAP doesn’t really support broadcasting multiple APs well. So we’ll need to do a few tweaks in RaspAp first.
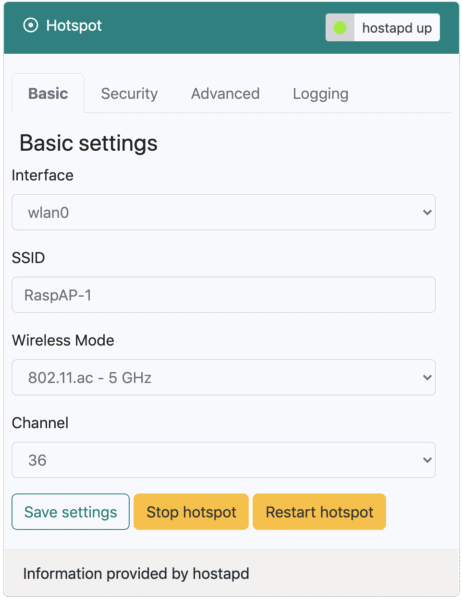
- In the RaspAp web GUI, go to Hotspot > Basic tab to create the base configurations. Configure an AP for the onboard
wlan0interface with the settings shown below. Choose Save settings to write this to the filesystem.wlan0is the onboard WiFi, which we’ll be using as fallback / backup to the USB Wifi dongle. So I recommend setting it up with a 2.4Ghz network.
- Then, go into the windows terminal (CMD) and type:
ssh [email protected], the default password is secret - Type the following in the ssh terminal:
sudo cp /etc/hostapd/hostapd.conf /etc/hostapd/wlan0.conf - Back to the RaspAp web GUI, now choose
wlan1and set it up as a 5Ghz network (this is your USB dongle, so I recommend setting it up as the 5Ghz network, but you can also switch and use it for 2.4Ghz network, whatever you want). Click save settings again. - Back to the SSH terminal, type:
sudo cp /etc/hostapd/hostapd.conf /etc/hostapd/wlan1.conf - Configure dnsmasq:
Still in SSH, type:sudo cp /etc/dnsmasq.d/090_wlan0.conf /etc/dnsmasq.d/090_wlan1.conf
sudo nano /etc/dnsmasq.d/090_wlan1.conf - Edit this file so it looks like the example below, then save it and exit your editor.
# RaspAP wlan1 configuration
interface=wlan1
domain-needed
dhcp-range=10.4.141.50,10.4.141.254,255.255.255.0,12h - Configure dhcpcd:
Similar todnsmasq, thedhcpcdservice is preconfigured with RaspAP’s default settings. Open this file in an editor by executingsudo nano /etc/dhcpcd.conf, then add awlan1block to the end of the file:

# RaspAP default configuration
hostname
clientid
persistent
option rapid_commit
option domain_name_servers, domain_name, domain_search, host_name
option classless_static_routes
option ntp_servers
require dhcp_server_identifier
slaac private
nohook lookup-hostname

# RaspAP wlan0 configuration
interface wlan0
static ip_address=10.3.141.1/24
static routers=10.3.141.1
static domain_name_server=9.9.9.9 1.1.1.1

# RaspAP wlan1 configuration
interface wlan1
static ip_address=10.4.141.1/24
static routers=10.4.141.1
static domain_name_server=9.9.9.9 1.1.1.1
Finally, enable the Log DHCP requests toggle on RaspAP’s DHCP Server > Logging tab. Be sure to restart the dnsmasq service.
Step 3 – Fix Persistent Issues Using My Custom Scripts
The final step of this guide involves running scripts that I created which perform all the setup you need to finalize this setup.
💡 https://github.com/moryoav/raspap-multi-ap
These scripts do the following:
- Automatically set up your multiple APs after reboot.
- Link the outgoing APs to the correct internet interface (e.g., whichever Wi-Fi you connected to).
- BONUS: They also enable your Pi to automatically connect to known Wi-Fi on boot (instead of requiring you to manually connect each time).
This means your travel router becomes 100% plug-and-play. Boot it up, and it will scan for known networks, connect automatically, and start broadcasting your secure networks, all with ad-blocking and secure home routing enabled.
What’s Next?
In the next post in this series, we’ll go over:
- How to set up automatic ad-blocking.
- How to configure a tunnel traffic through your home, creating a seamless “home away from home” experience for all your devices.
- How to easily connect to WiFi networks to get internet into the device (using a mobile app).
Stay tuned!