A VPN (Virtual Private Network) encrypts your internet connection, ensuring privacy and security by masking your IP address and routing traffic through secure servers. In Unraid, a VPN can be especially useful for:
Privacy: Hiding your server’s activity from your ISP or network administrators.
Security: Protecting sensitive data transfers.
Flexibility: Choosing which Docker containers use the VPN connection.
Setting up a VPN in Unraid is straightforward, especially with the latest versions. This guide will demonstrate the process using ProtonVPN, a free service I’ve personally found reliable and fast. However, the steps are similar for any other VPN provider.
Steps to Set Up a VPN in Unraid
1. Create a VPN Account
First, sign up for a VPN service. I chose ProtonVPN for its speed and free tier, which meets my needs.
Browse the server list. Each server shows a load percentage. Choose a server that is:
Geographically close to your location.
Low in load for optimal performance.
Click Download to save the config file in a safe location.
3. Import the VPN Config into Unraid
Now, configure the VPN in Unraid:
Navigate to Settings → VPN Manager in the Unraid dashboard.
Click Import Tunnel and upload the configuration file you downloaded.
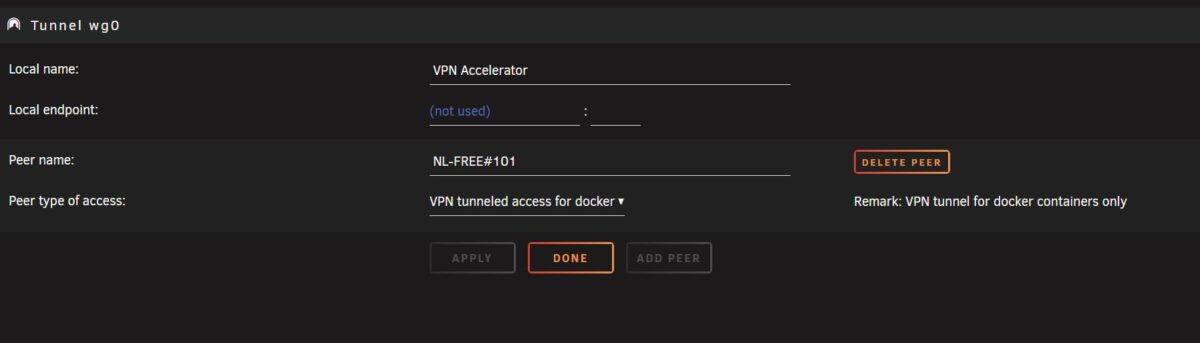
Under Peer Type of Access, select VPN Tunneled Access for Docker.
Make sure it is set to “Active” and “Auto Start“
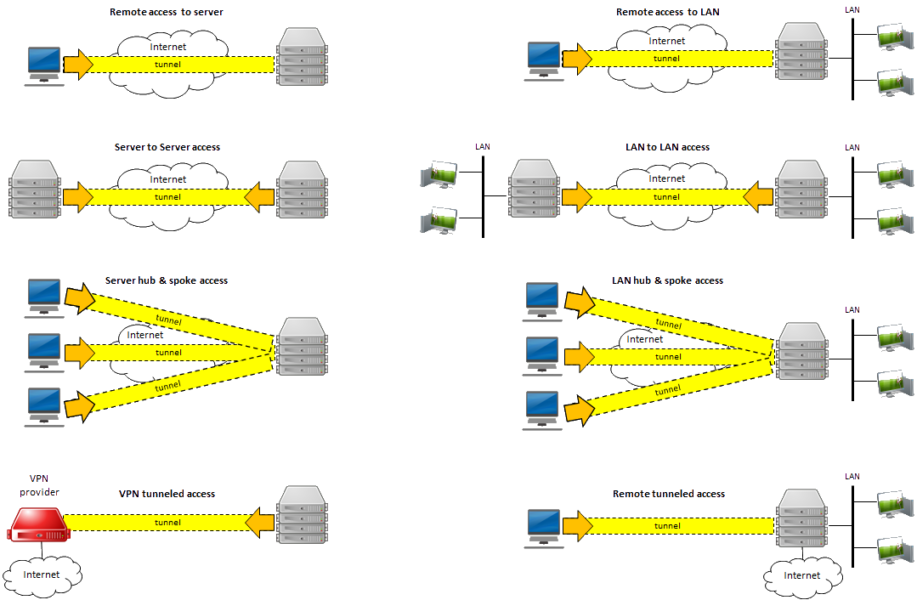
Note: This option allows you to choose which Docker containers route traffic through the VPN. For a visual guide on the options, refer to the illustration below.
4. Configure Docker Containers to Use the VPN
To enable VPN routing for specific Docker containers:
Go to the Docker tab in Unraid.
Select the Docker container you want to route through the VPN.
Click on it and go to Network Type.
Choose the tunnel you created earlier.
Important Note: Transmission Docker Compatibility Issue
While this setup works for most Docker containers, there’s an issue with Transmission, a popular torrent client (and quite possibly all other torrent clients as well). These applications require port forwarding, which isn’t available in ProtonVPN’s free tier.
If you rely on Transmission or similar applications, you may need to:
Upgrade to a paid ProtonVPN plan for port forwarding.
Explore alternative solutions.
If anyone has a workaround or suggestions, feel free to share them in the comments!
Conclusion
Using a VPN in Unraid allows you to enhance security and control over your Docker containers with minimal effort. ProtonVPN’s free tier makes this process accessible, though some limitations like port forwarding can affect specific use cases. By carefully selecting a VPN service and configuring tunnels for individual containers, you can protect your network while maintaining flexibility. If you encounter any issues or discover solutions, share your experience!
To provide the best experiences, we use technologies like cookies to store and/or access device information. Consenting to these technologies will allow us to process data such as browsing behavior or unique IDs on this site. Not consenting or withdrawing consent, may adversely affect certain features and functions.
Functional
Always active
The technical storage or access is strictly necessary for the legitimate purpose of enabling the use of a specific service explicitly requested by the subscriber or user, or for the sole purpose of carrying out the transmission of a communication over an electronic communications network.
Preferences
The technical storage or access is necessary for the legitimate purpose of storing preferences that are not requested by the subscriber or user.
Statistics
The technical storage or access that is used exclusively for statistical purposes.The technical storage or access that is used exclusively for anonymous statistical purposes. Without a subpoena, voluntary compliance on the part of your Internet Service Provider, or additional records from a third party, information stored or retrieved for this purpose alone cannot usually be used to identify you.
Marketing
The technical storage or access is required to create user profiles to send advertising, or to track the user on a website or across several websites for similar marketing purposes.