Introduction
An RTL‑SDR (Realtek Software Defined Radio) dongle is a low‑cost USB device that lets your computer capture live radio signals over a broad range of frequencies. With it, you can do many things—for example:
- Receive FM and AM broadcasts:
The primary and most common use is to listen to FM (and AM) radio. The standard antenna included with many RTL‑SDR dongles works best for FM frequencies. For other types of broadcasts (such as digital or weather satellite signals), you might need to invest in a different antenna tuned to those frequency ranges. - Monitor local services:
You can tune in to local police, emergency services, and trunked radio communications. However, note that some broadcasts (like police or emergency channels) may be encrypted in your area, which limits the ability to listen in. - Track aircraft and satellites:
Decode air traffic control conversations or ADS‑B signals to monitor aircraft, as well as receive weather satellite images and even meteorological balloon data. - Listen to amateur radio:
Hobbyists can also pick up ham radio transmissions and various digital signals.
My interest in this project began when I needed a solution to receive radio broadcasts inside a safe room with thick concrete walls. Although that room had wired internet, the concrete blocked radio signals. By setting up my Unraid server in a location with good reception and using it as a radio server, I could stream live broadcasts to devices—even those in the reception‑challenged room.
Setting Up Your RTL‑SDR Scanner on Unraid
Your Unraid server becomes the central hub for receiving and distributing radio signals. Follow these steps to install the scanner’s server side on Unraid:
- Purchase a Reliable RTL‑SDR Dongle:
Find a genuine RTL‑SDR dongle from a reputable source. For instance, check out this Aliexpress link and compare options using the guide on rtl-sdr.com. Authenticity is key because many low‑quality counterfeits exist. - Install the Scanner Server on Unraid:
- Open the Docker tab in Unraid and click Add Container (usually at the bottom).
- Fill out the required settings as shown in your reference screenshot (a sample screenshot from my system shown below).
- Approve the settings and start the container.
- Configure the Spyserver:
- Navigate to your Unraid appdata folder and create a folder named spyserver (if it doesn’t exist).
- Place the provided configuration file into the spyserver folder. Download it here.
- Restart the spyserver container via the Docker tab—your radio server is now set up and ready to receive signals.

Listening to Radio Broadcasts with SDR Software
To actually decode and listen to the received signals, you’ll need client software. For Windows systems, I recommend SDR# (SDR Sharp); for Android devices, consider using MagicSDR.
SDR# Installation and Setup on Windows
Below is a step‑by‑step guide for setting up SDR# on a Windows system with links to key images from the original instructions.
- Install Required Runtimes:
Ensure your PC has the following installed: - Download SDR#:
Visit www.airspy.com and click the downloads button next to the “Software Defined Radio Package” heading to download sdrsharp-x86.zip.
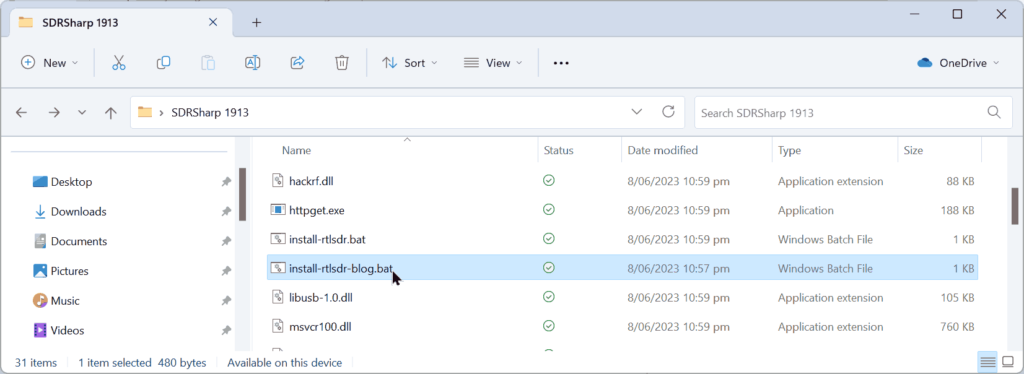
- Extract SDR# Files:
Unzip the sdrsharp-x86.zip file into a folder on your PC. (Tip: Avoid extracting into the “Program Files” folder to prevent permission issues.) - Run the Driver Installer:
In the extracted folder, double‑click install-rtlsdr.bat.
This will download necessary drivers (includingrtlsdr.dllandzadig.exe). - Configure the Dongle with Zadig:
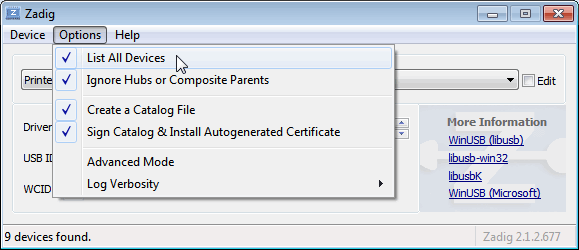
- Find zadig.exe in the SDR# folder and run it as administrator.
- Click Options → List All Devices to display all connected devices.
- Select Bulk‑In, Interface (Interface 0) from the dropdown (ensure the USB ID reads “0BDA 2838 00”).

- Install the Correct Driver:
Verify that the box to the right of the arrow shows WinUSB. Accept any warnings by clicking “Install this driver software anyway.” - Launch SDR#:
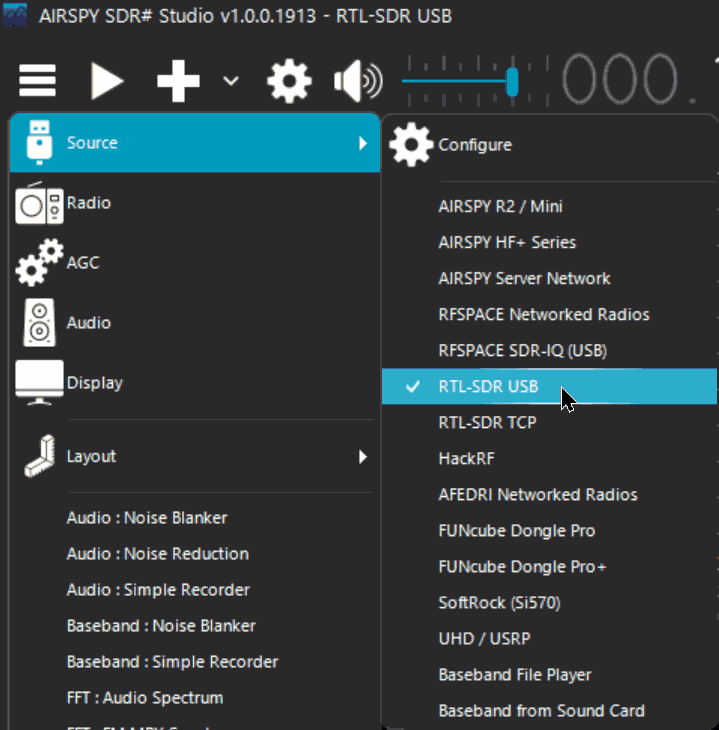
Open SDRSharp.dotnet8.exe from the extracted folder. In the top left “Source” menu, select RTL‑SDR USB if the dongle is local—or AIRSPY Server Network if you’re connecting remotely (then enter your Unraid server’s address, for example,sdr://192.168.1.69:5556). - Start Receiving Signals:
Click the Play button (displayed as a right‑facing triangle) to start tuning into radio signals. - Adjust RF Gain:
Use the RF gain slider (typically located in the source window in the lower left) to increase the gain until additional signals become visible. A zero‑gain setting may only pick up very strong FM stations.


Local vs. Networked Listening
- Local Listening:
If the RTL‑SDR dongle is plugged directly into the same computer running SDR software, you should select RTL‑SDR USB as your source, as shown above. - Networked Listening:
If your dongle (and server software) are running on your Unraid server—while you’re using another computer or device to listen—select AIRSPY Server Network as your source. When prompted, enter your Unraid server’s address in the following format:sdr://192.168.1.69:5556Replace192.168.1.69with your actual Unraid server IP.
If you’re on Android and wish to receive broadcasts on your phone as well, I recommend using the app MagicSDR for a simple and effective way to listen to radio signals on the go.
Conclusion
In this post we covered how to set up an RTL‑SDR radio scanner using your Unraid server and SDR# software, including detailed installation steps and configuration tips for both local and networked setups. This approach can be especially valuable during emergencies when internet-based radio streams aren’t available, or in locations like safe rooms with concrete walls that block traditional reception. I’d love to hear about your experiences—what unusual or interesting broadcasts have you managed to catch? Share your stories in the comments below!
Note: Image links are sourced from rtl-sdr.com