Requirements
Although you’re more than welcome to just read this post for general knowledge, check out my recommendations for what you need to have, in order to be able to fully use the provided information.
Introduction
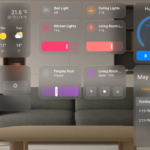
Home Assistant’s Weather Forecast Card provides a useful view of the weather forecast for the next few hours or days, depending on whether you choose the daily or hourly forecast. I personally use this card on a wall-mounted tablet by the entrance to my house, allowing me to check the hourly forecast before leaving.
While this card is functional, you can enhance its appearance by using animated weather icons, adding a nice visual touch to your Home Assistant dashboard. These icons replace the static ones with moving visuals that offer more engaging feedback on weather conditions like sunny, cloudy, rainy, and more.


In a previous post, I covered how to add themes to your Home Assistant dashboard, and today, we’ll focus on implementing animated weather icons to give your dashboard a polished look. This guide is inspired by this project, which utilizes icons available from AmCharts.
Step-by-Step Guide to Adding Animated Weather Icons
1. Install Samba Share Add-on
To easily access your Home Assistant files, it’s best to install the Samba Share add-on. Here's how:
- Navigate to Settings > Add-ons > Add-on store in your Home Assistant.
- Find Samba share and click it.
- Click Install.
2. Configure Samba Share
- After installation, configure Samba by setting a username and password.
- Save the configuration and start the add-on.
- To connect, open File Explorer (Windows) or Finder (Mac), and connect to the following paths depending on your OS:
- Windows:
\\<IP_ADDRESS>\ - macOS:
smb://<IP_ADDRESS>
- Windows:
3. Download Animated Weather Icons
- Open the config/www folder within your Home Assistant.
- Create a subfolder called
animated-weather-card. - Download and unzip the files from this link into the newly created folder.
4. Configure Themes for Animated Icons
If you already use a custom theme, append the following lines to the end of your theme’s YAML file to enable the animated weather icons:
weather-icon-clear-night: url("/local/animated-weather-card/clear-night.svg")
weather-icon-cloudy: url("/local/animated-weather-card/cloudy.svg")
weather-icon-fog: url("/local/animated-weather-card/fog.svg")
weather-icon-lightning: url("/local/animated-weather-card/lightning.svg")
weather-icon-lightning-rainy: url("/local/animated-weather-card/lightning.svg")
weather-icon-partlycloudy: url("/local/animated-weather-card/partlycloudy.svg")
weather-icon-pouring: url("/local/animated-weather-card/pouring.svg")
weather-icon-rainy: url("/local/animated-weather-card/rainy.svg")
weather-icon-hail: url("/local/animated-weather-card/hail.svg")
weather-icon-snowy: url("/local/animated-weather-card/snowy.svg")
weather-icon-snowy-rainy: url("/local/animated-weather-card/hail.svg")
weather-icon-sunny: url("/local/animated-weather-card/sunny.svg")
weather-icon-windy: url("/local/animated-weather-card/cloudy.svg")
weather-icon-windy-variant: url("/local/animated-weather-card/partlycloudy.svg")
weather-icon-exceptional: url("/local/animated-weather-card/exceptional.svg")
5. Setting Up Animated Icons Without a Theme
If you aren’t using a custom theme yet, here’s how to quickly set up your animated icons while keeping the default look of Home Assistant:
- In your config/themes folder, create a new subfolder named
animated-weather-card. - Inside this folder, create a file called
animated-weather-card.yamland paste the following code:
Animated Weather Card:
    weather-icon-clear-night: url("/local/animated-weather-card/clear-night.svg")
    weather-icon-cloudy: url("/local/animated-weather-card/cloudy.svg")
    weather-icon-fog: url("/local/animated-weather-card/fog.svg")
    weather-icon-lightning: url("/local/animated-weather-card/lightning.svg")
    weather-icon-lightning-rainy: url("/local/animated-weather-card/lightning.svg")
    weather-icon-partlycloudy: url("/local/animated-weather-card/partlycloudy.svg")
    weather-icon-pouring: url("/local/animated-weather-card/pouring.svg")
    weather-icon-rainy: url("/local/animated-weather-card/rainy.svg")
    weather-icon-hail: url("/local/animated-weather-card/hail.svg")
    weather-icon-snowy: url("/local/animated-weather-card/snowy.svg")
    weather-icon-snowy-rainy: url("/local/animated-weather-card/hail.svg")
    weather-icon-sunny: url("/local/animated-weather-card/sunny.svg")
    weather-icon-windy: url("/local/animated-weather-card/cloudy.svg")
    weather-icon-windy-variant: url("/local/animated-weather-card/partlycloudy.svg")
    weather-icon-exceptional: url("/local/animated-weather-card/exceptional.svg")
Conclusion
That's it! You’ve now set up animated weather icons to enhance your Home Assistant weather forecast card. Whether you’re using a custom theme or the default Home Assistant look, these icons will add a more engaging visual appeal to your dashboard.